If you are familiar with the issues of fear of heights and feeling unsafe when hiking, you are not alone. Many hiking enthusiasts know that queasy feeling in the stomach when the path narrows or the view plunges into the depths – for example, from a cable car cabin. Often, the brain quickly kicks in: Warning, danger! Loss of control! Get out of here!
Fear of heights – technically known as acrophobia – is widespread. Symptoms range from mild discomfort to intense panic and can affect people of all ages and types, whether they are daredevils or more cautious travelers. Statistically, women are slightly more affected than men. One thing is clear: fear of heights can quickly turn a hike into torture and overshadow what should be a beautiful experience of nature with strong negative feelings.
Fear of heights leads to insecurity, and insecurity reinforces fear of heights. It's a vicious circle.
Falko Burghausen
In this article, we take a closer look at the differences between fear of heights and general uncertainty when hiking or mountaineering. We also show you practical solutions, methods, and techniques that you can use to improve your safety and independence in the mountains, and take a detailed look at the topic of tour planning.
What happens when you have a fear of heights?
When you stand at a potential fall point – be it on an exposed path, a balcony, or a viewing tower – your perception changes significantly (https://link.springer.com/article/10.1007/s00415-020-09805-4). The distance to stable, familiar objects increases, especially vertically, which means that your sense of balance lacks important visual cues. This makes it more difficult to control your body automatically.
Studies show that people with a fear of heights are particularly sensitive to this situation: they tend to move their bodies more when standing (postural fluctuations) and have more difficulty maintaining their balance. The balance and position perception systems (vestibular and proprioceptive) have to work harder. Some people manage this well, others less efficiently. The result is an increased feeling of insecurity, whether on the mountain or in everyday life.
Typical symptoms
Symptoms vary from person to person. Rocking vertigo (not spinning vertigo), greatly increased body tension, or muscle stiffness often occur. In extreme cases, panic attacks can occur, which is a dangerous reaction, especially in alpine terrain. Other typical signs include an accelerated heartbeat, increased blood pressure, rapid breathing, sweating, trembling, or nausea.
These reactions can be explained [evolutionarily](https://www.brainfacts.org/thinking-sensing-and-behaving/emotions-stress-and-anxiety/2021/researchers-pinpoint-fear-of-heights-in-the-brain-011221? utm_source=chatgpt.com): falling from a great height could cost you your life in the past, just as it can today. Our body reacts reflexively to the potential threat.
How fear of heights and insecurity are related
Fear of heights usually leads directly to insecurity and creates a cycle that quickly intensifies. Suddenly, placing your foot securely becomes a challenge. Even though your foot is already stable, you repeatedly correct your position or try to place it even "better." Your movements seem jerky and tense, and simple steps feel difficult and uncoordinated. This is often accompanied by the feeling of being pulled into the depths by an invisible force.
This is because the entire body stiffens due to fear. Mobility decreases, as does the ability to adapt to changing terrain. But this is precisely what is central to hiking, because every step requires agility and adaptation to new ground conditions.
As soon as we become uncertain, the feeling of instability increases. We lose our footing, lose our flow, and become increasingly unsteady. And this happens in an environment that demands stability. This increases the fear of the next step, and confidence in our own abilities continues to decline.
This vicious circle is persistent, but not hopeless. With targeted training, both fear of heights and sure-footedness can be noticeably improved for more composure and safety on your tours.

Looking into the emptiness of the horizon intensifies the symptoms of fear of heights.
The missing visual reference point
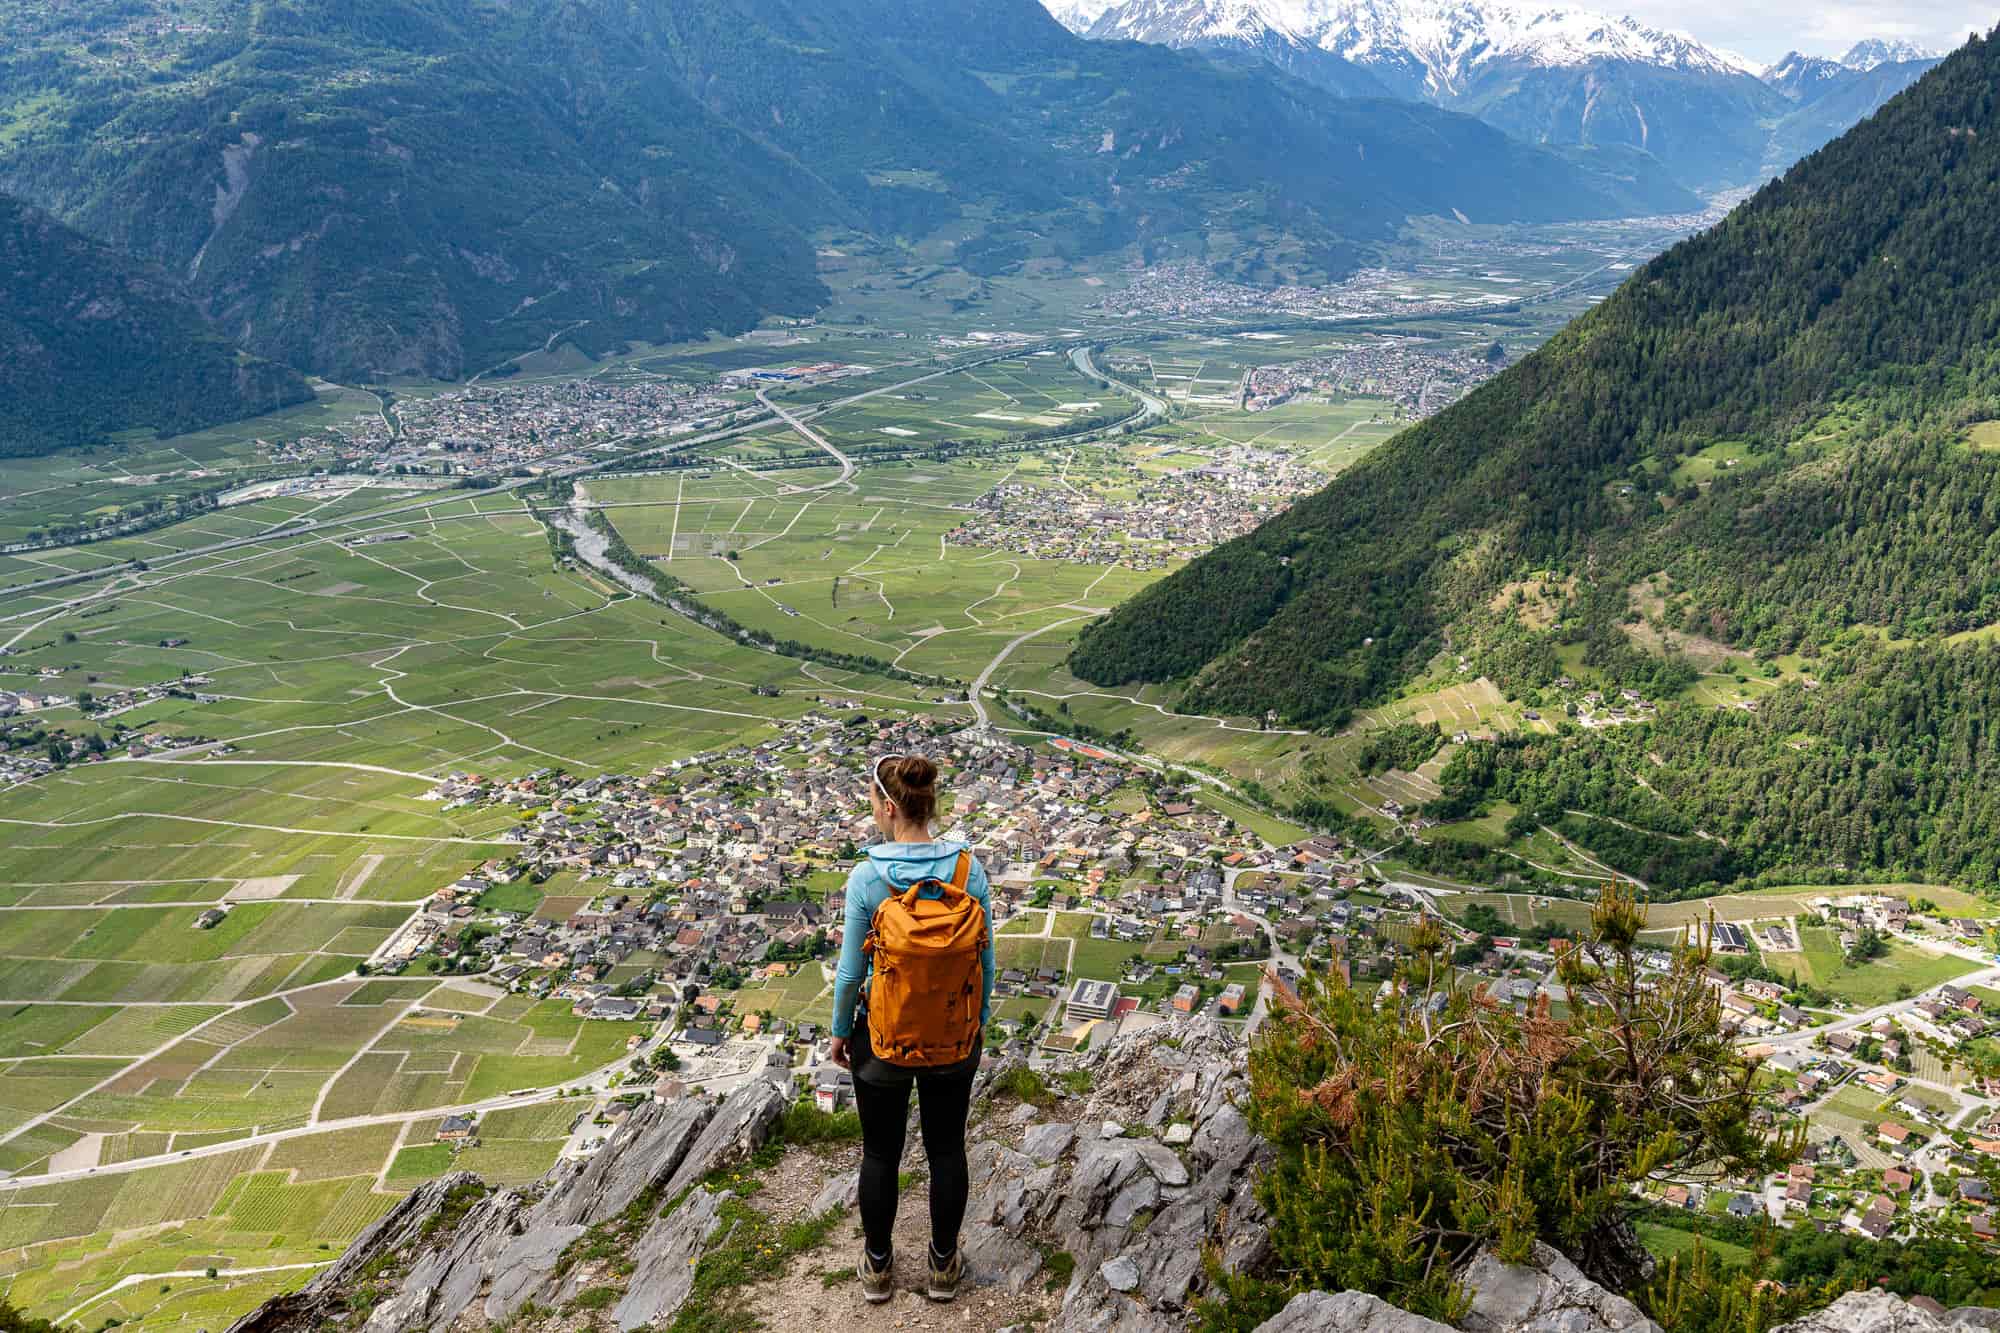
Whether looking down into the depths, across wide valleys, or descending into apparent emptiness, all these situations have one thing in common. Unlike on a horizontal forest floor or in a city, there are no stable visual landmarks that normally help our brain to classify space and movement. Our gaze may be directed at a specific point, but the brain processes much more than just the focused section and constantly analyzes the entire environment.
When our gaze wanders away from the mountain into the distance or when walking along a ridge with steep drops to the right and left, the brain often has only the narrow path as a reference point. In addition, the terrain in such situations is usually much more challenging than, for example, a well-maintained hiking trail or a paved road. The combination of height, distance, and technical difficulty quickly leads to overwhelm and uncertainty.
A proven tactic for acute fear of heights is to turn towards the mountain, i.e., to turn your face towards the rock face or slope and crouch down, sit down, or, in extreme cases, lie down. This not only stabilizes you physically, but also provides more visual support: your gaze regains clear, close reference points, your brain finds its bearings, and a feeling of safety can slowly return.
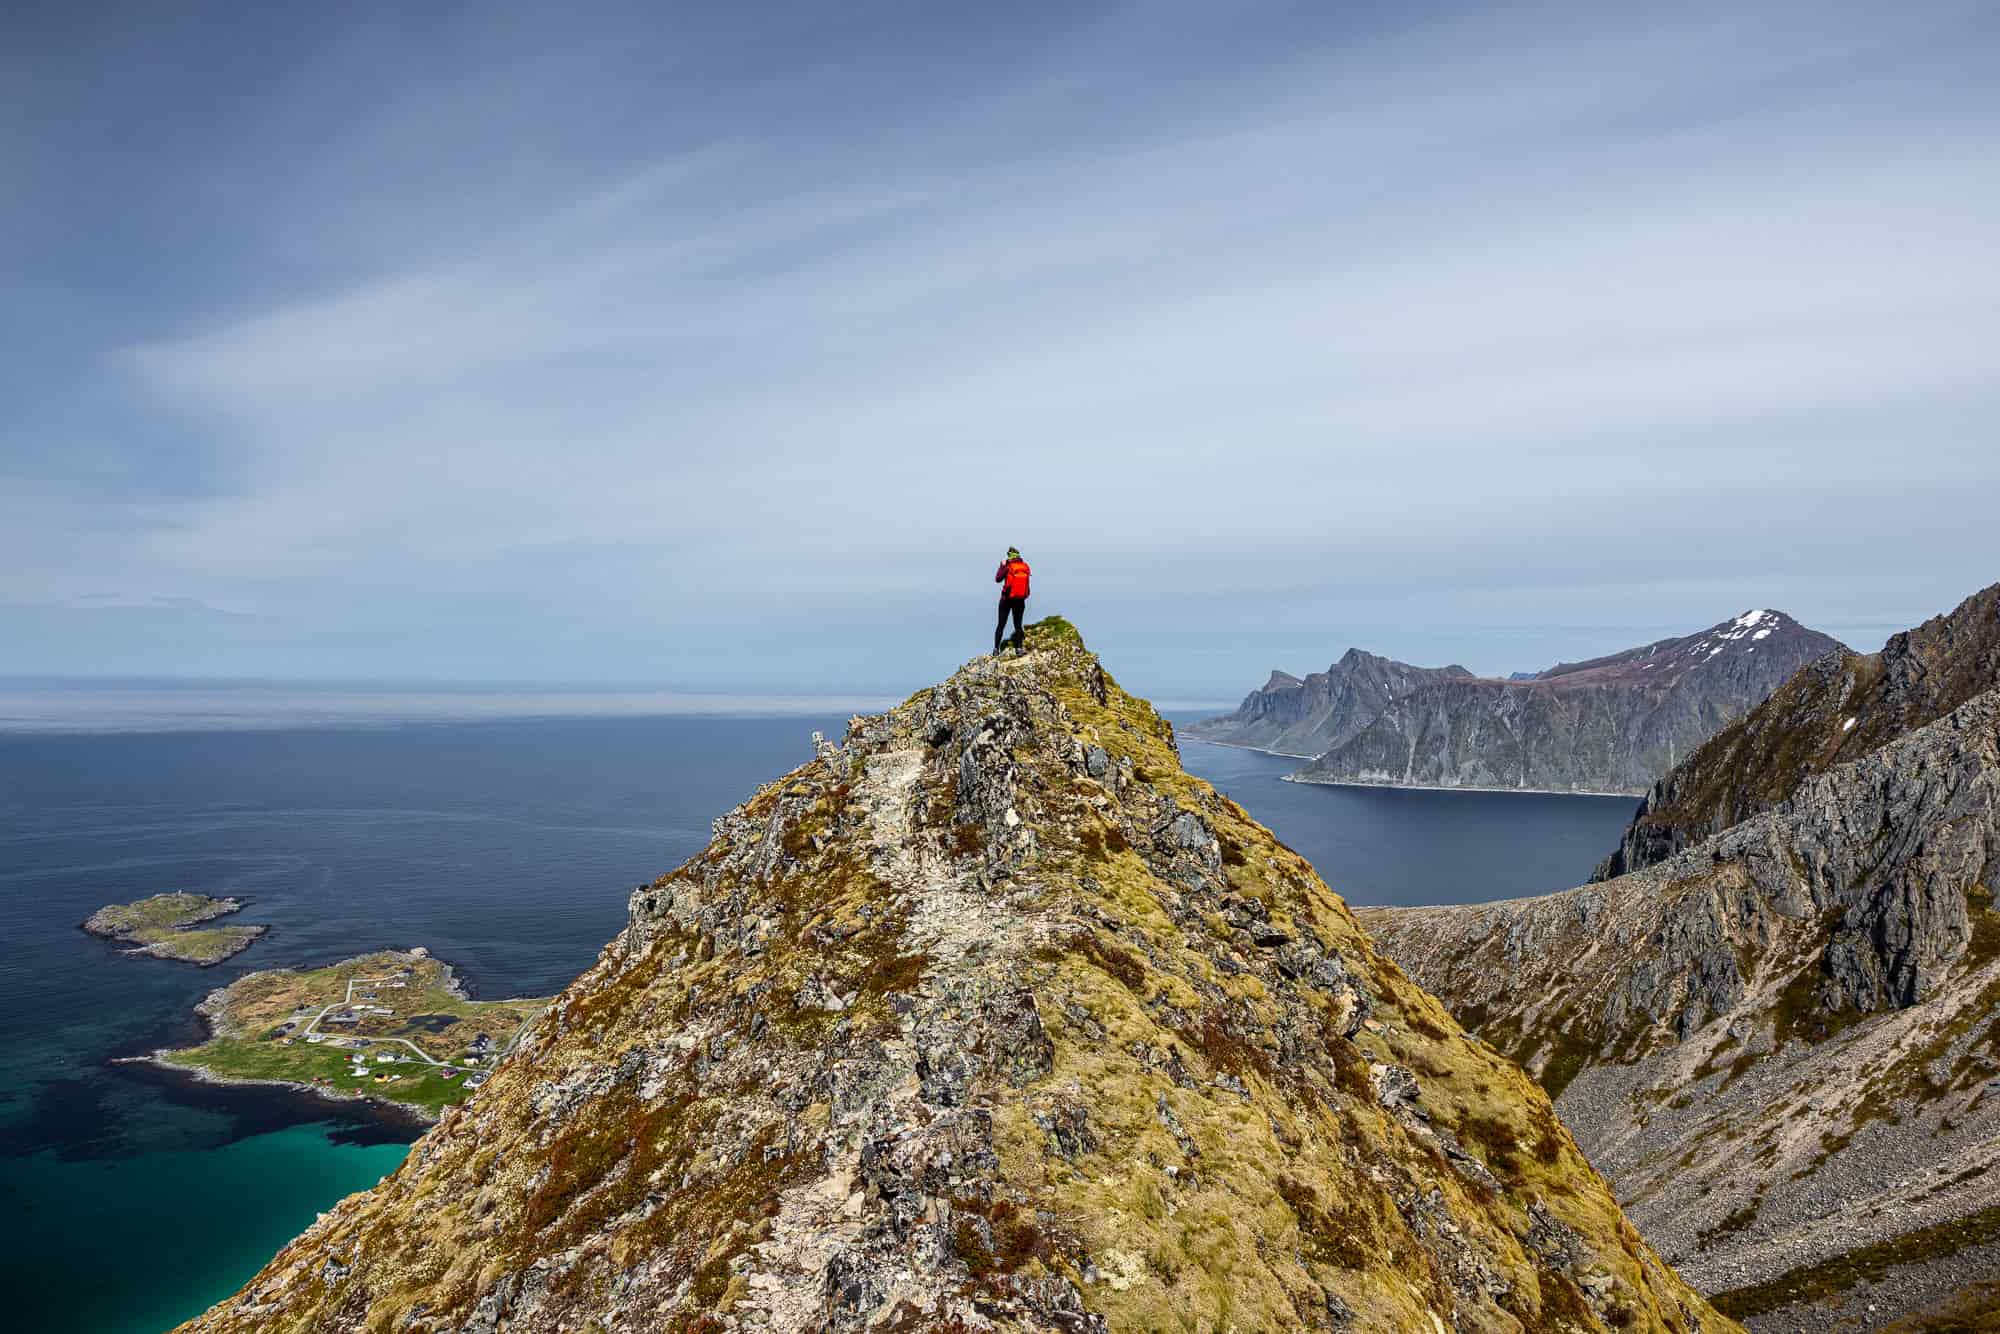
Typical situations in the mountains that can trigger fear of heights
As long as you are walking on a wide hiking trail without any views down into the depths, fear of heights usually remains in the background. But that can change quickly when certain factors come into play:
- Narrow and exposed paths: The less space the path offers, the stronger the feeling of insecurity can become. It becomes particularly critical when the ground is unstable or your feet cannot find a secure foothold. Such situations are an ideal breeding ground for feelings of fear.
- Ridge walks: A ridge is considered the ultimate test of exposure. With steep drops on both sides, there are no clear landmarks for the eye to focus on. The only support is the narrow path under your feet, which is a real mental challenge for many.
- Steep crossings on slopes: When the path leads diagonally across a steep flank, the gradient is crucial. At around 30 degrees, a fall is almost impossible to break, and our subconscious knows this only too well. If the slope is terminated by a rock face further down, as is often the case in the Appenzell Alps, for example, the unease is further heightened.
- Ladders, footbridges, and metal stairs: Such elements can, but do not necessarily have to, become a problem. Some people feel safer here because they can hold on and have a clear visual reference point. However, the height is often the decisive factor, because at a certain distance from the ground, it becomes tricky here too.
- Scree fields and unstable ground: Moving ground such as steep scree or snow fields convey instability. Your feet cannot find reliable footing, and your gaze is lost in the distance. This is a typical scenario for the onset of fear of heights.
- Bridges: Suspension bridges and similar structures can be challenging depending on their nature and length, especially if they move. The feeling of not having solid ground beneath your feet can quickly become frightening for those affected.
- Airy passages on mountain peaks: During the ascent, the gaze is usually directed towards the mountainside, which provides visual orientation. But as soon as you reach the summit or a mountain pass, this point of reference suddenly disappears. Your gaze wanders down into the valley, you seem to lose your footing, and this is where the fear of heights becomes particularly apparent for many people, especially during the descent.
Planning hikes despite a fear of heights
If you know that exposed areas cause you difficulty, this does not mean that you have to give up hiking. With a little preparation and careful route selection, many tours can be undertaken safely and with confidence.
A good starting point is the trail markings. These vary from country to country. In Switzerland, for example, yellow-marked trails are considered easy hiking routes without exposed passages or with well-secured sections (categorization of Swiss hiking trails). Trails marked in red-white-red, on the other hand, require more experience and planning, as they may contain longer exposed sections. In the German Alps and Tyrol, the markings are based on the ski slope model: blue stands for easy, red for medium difficulty, and black for difficult. Here, too, the more thoroughly you plan, the better you can avoid unpleasant surprises.
Important to know: The marking color or difficulty rating (e.g., T2 or "moderately difficult") says little about the actual exposure of a trail. Photos, reports, and good maps can help you get a realistic picture of the conditions.
How to plan your hike:
- Basic research on the region: In the foothills of the Alps, you will often find routes that are less exposed but still rewarding. In steeper regions such as the Dolomites or the Bernese Oberland, the likelihood of exposed sections is significantly higher.
- Use high-quality maps: Use topographic maps such as Swisstopo, Kompass, Freytag & Berndt, or the Alpine Club maps. Pay attention to the classification of the trails and display the appropriate layers.
- Analyze the topography: Look closely at the map and try to interpret the terrain. Steep lines, tight curves, or ridges are often easy to spot and indicate potentially tricky sections.
- Search for pictures and reviews: Use platforms such as Hikr.org, Instagram, Komoot, or Bergwelten to find photos and reports on key points along your planned route. These will help you mentally prepare for the tour.
- Plan an alternative route: Think of a plan B in case you feel uncomfortable. Is there a less exposed route, a shortcut, or a cable car? Make a note of these options.
- Find out about the weather and conditions: Trails can become significantly more difficult in wet, snowy, or windy conditions. Check the current conditions and adjust your plans accordingly.
- Time management: Start early enough to allow yourself plenty of time on the trail. This will keep you flexible and prevent you from getting stressed. With enough time to spare, you can tackle more challenging sections at a leisurely pace and maybe even treat yourself to a relaxing finish at the end.
Sample plan: Fronalpstock (Central Switzerland, Switzerland)
As a practical example, let's take a look at the hike from the village of Stoos to Fronalpstock (1,921 m). The Fronalpstock offers a magnificent view over Lake Lucerne. However, the terrain drops steeply, especially on the south and southwest sides. Fortunately, there are several routes to the summit: via Chlingenstock, over the Huser Stock, or through the quieter Frontal.
A glance at the topographic map provides initial insights into the possible routes:

In summary, the hike to Fronalpstock can be described as follows:
- The easy loop via Frontal and Fronalp covers an elevation gain of around 600 meters over a distance of approximately 8 to 9 kilometers.
- Two chairlifts lead up to Fronalpstock and Chlingenstock. Operating times should be checked online in advance so that they can be taken into account when planning.
- The route through Frontal on the ascent and via Fronalp on the descent is a relatively easy crossing. Although there is a short, moderately difficult passage, this is on the ascent, where fear of heights is less common as the view is mostly directed uphill. Retreat is possible at any time, so you won't find yourself in a dead end.
- The summit area of the Fronalpstock is wide and well secured with yellow-marked trails, making it ideal for people with a fear of heights.
- The variants via Huser Stock and Chlingenstock run along a partially exposed ridge on a red-and-white-marked trail. Although there are possibilities for emergency descents, problems are to be expected on these sections if you are prone to fear of heights. Looking at pictures in advance can help you prepare mentally for these passages.
- In wet conditions, only the two yellow-marked routes are recommended.
Thanks to the excellent Swisstopo maps and the wealth of information available on the internet, this tour can be planned in detail and safely, preventing any problems for those afraid of heights.
Sample plan: Aggenstein (Tyrol, Austria)
Next, we take a look at Aggenstein (1,985 m) – a popular destination for hikers from southern Germany and visitors from the Austrian Tannheimer Valley. The ascent is often via the Bad Kissinger Hütte (1,788 m).
Although the map material for Tyrol is not quite on par with the Swiss national maps, compass maps or digital platforms can also be used to identify potentially tricky passages in advance. At first glance, certain terrain features can be identified that could be relevant in terms of fear of heights:

Let's summarize the plan here as well:
- The hike covers an elevation gain of about 800 to 900 meters and a total distance of about 8 to 9 kilometers.
- According to the map, the ascent via trail no. 40, continuing on trail no. 19/414 towards the Bad Kissinger Hütte, does not appear to be particularly exposed. Only a short section before the junction with trail no. 411 is difficult to assess.
- The Bad Kissinger Hütte is an ideal stopover to obtain further information about the trail conditions on site. The final ascent to the summit is rocky, probably exposed, and therefore poses a potential problem, especially in wet conditions and for those afraid of heights. In this case, the hut can be a worthwhile destination without climbing the summit itself. According to the map, the descent via trail no. 411 is not exposed and offers a safe return route.
A key difference compared to planning in Switzerland is the quality of the maps: while Swisstopo maps provide an extremely accurate representation of the landscape, hikers in other countries – such as Tyrol – are more reliant on additional research and images from the internet. This makes careful preparation all the more important.
How to deal with fear of heights while hiking
Fear of heights rarely occurs in everyday situations. However, things are very different in the mountains. When hiking or mountaineering, we deliberately move in terrain that can be associated with a risk of falling. Depending on the route, safety measures, and condition of the path, this can be harmless or very challenging. Particularly exposed crossings or ridge passages often push those affected to their limits.
But what can you do if you are overcome by fear of heights while out and about? How can you calm your body so that you regain control?
Create a safe space for yourself
The most important step is to signal to your body that nothing can happen to you here. The best way to do this is to sit or kneel down. In intense cases—if the terrain allows it—lying down can also help. Inform your companions, consciously take your time, and accept that your body is sending you a clear stop signal.
Don't react with anger towards yourself and don't try to gloss over the situation. Fear of heights is nothing to be ashamed of. It can affect anyone, even experienced mountaineers.
It is important that you can sit down in a safe place without being exposed to additional dangers such as rockfall. Whether you need a minute or fifteen, take this break. It is crucial for reducing your inner stress levels and enabling you to think clearly again. Only then does it make sense to move on to further strategies.
Control your breathing
In stressful situations, we automatically breathe faster. This further increases stress and intensifies anxiety. Conscious breath control helps to break this vicious cycle.
Breathe in calmly through your nose, pause for a moment, and then breathe out slowly through your mouth, ideally over five to six seconds. Repeat this breathing exercise ten to fifteen times.
This has several effects: your circulation calms down, your pulse slows, and the parasympathetic nervous system—the “rest nerve”—takes over. It slows your heart rate and lowers your blood pressure. At the same time, the sympathetic nervous system, which is responsible for the stress response, recedes into the background. In this way, you bring your body back to normal mode step by step.
Give yourself room to maneuver
Use the break to think about your options. Depending on the situation, terrain, and who you're with, there are usually several possibilities:
- Keep going with breaks: Continue the tour in small stages. Plan deliberate stops at safe, wider spots, such as bends in the trail or flat sections.
- Position yourself correctly in the group: If you are traveling with others, do not walk at the very back, but directly behind the most experienced person. Observe how they move, use the same steps, and orient yourself to their safety.
- Turn back: Turning back is also a completely legitimate decision and not a defeat! The mountain isn't going anywhere. Make an objective decision: Will turning back get you out of the exposed passage faster than continuing? Then turning back is often the best choice.
- Check for alternative routes: Is there another route that is less exposed? Perhaps you can continue hiking more safely by taking a small detour or a parallel path.
Discuss these options with your group. Good companions will be understanding and put your well-being above the tour destination. If not, communicate clearly and transparently: at this moment, you are the weakest link in the chain and need support, not persuasion or pressure.
Evacuation – avoid the worst-case scenario
What happens if you are completely stuck and can't see any way out?
If you can't move forward or backward and other factors such as approaching bad weather or the late hour are also a factor, you should decide on the last option in good time: organized mountain rescue. This should not be done lightly, but it is the only way to avoid worse scenarios. If you decide to take this step, do so in good time and not when night is already falling. Search flights are extremely expensive and time-consuming, and without the appropriate insurance or sponsorship, you will have to cover these four- to five-figure costs yourself.
Beware of hidden costs: an evacuation is not legally considered a rescue! A rescue takes place when you are injured after an accident on the mountain. An evacuation is a rescue after you are stranded, even though you are not physically ill or injured. Many health insurance companies only pay in the event of a rescue. Evacuation is not covered and must be paid for by you in this case. It is therefore worth becoming a patron of organizations such as Air Zermatt or Rega to prevent such cases.
Nevertheless, it is ultimately important and right to decide to raise the alarm if there is no safe alternative. Even the high costs do not justify the risk of a real accident happening and resulting in serious injury or even death.
What factors increase fear of heights and uncertainty when hiking?
Fear of heights is not a fixed, constant phenomenon. One day you may hike a familiar route completely relaxed, while the next day you may be gripped by fear in the same place. This is because various internal and external factors have a major influence on how stable you feel, both physically and mentally.
Some of these influencing factors can be taken into account when planning your tour, for example with the help of the 3x3 filter method. Here is an overview of the most important points:
- Stress as a trigger: If you start the tour already feeling mentally tense, the threshold for fear of heights is significantly lower. Make sure you set off feeling relaxed and plan a simple, well-secured route on stressful days.
- Technical overload: If you feel overwhelmed by the terrain, your self-confidence will drop. If this is then combined with exposure, it creates a dangerous mix of uncertainty and psychological pressure.
- Difficult trail conditions: Wetness, snow, or ice turn even simple passages into slippery obstacles. Where you would otherwise feel safe, doubt sets in and fear takes hold.
- Weather and visibility conditions: Strong winds, fog, or clouds rolling over a ridge create a threatening atmosphere. Wind in particular adds instability, which can increase uncertainty.
The last two points in particular can usually be avoided with good preparation. If you check the weather and conditions carefully in advance and adjust your route accordingly, you can eliminate many potential triggers for fear from the outset and start your tour feeling more relaxed.

Step-by-step strategies for long-term improvement
So far, we have discussed how you can deal with acute fear of heights during a hike. But in the long run, it is worth working on the root of the problem with the aim of gaining more composure and confidence in the mountains in the long term.
This requires patience, but also concrete strategies. Some can be implemented easily on your own, while others work better with professional support. The key is to actively address the issue. That is already the first big step toward change.
Gentle exposure and controlled altitude training
The safest way to improve is through small, measured confrontations. Instead of venturing onto difficult ridges right away, start with simple situations: a viewpoint with a railing, a wide path with a slight incline, or a short, well-secured bridge.
It is important that you never overdo it and that you can turn back at any time. Your nervous system needs to learn that height does not automatically mean danger. With each successfully mastered situation, your confidence grows, and it is precisely this confidence that is crucial for calming your balance system and making you feel more comfortable on the mountain.
Balance exercises for improved surefootedness
Good balance is the foundation for walking safely on uneven terrain. Exercises using a balance cushion or slackline are helpful. They are ideal for doing at home or in the garden. Just a few minutes a day can make a noticeable difference. You will not only train your balance, but also your body awareness. This will give you confidence on uneven or slippery surfaces.
Breathing techniques and mental focus
Breathing is a direct gateway to the nervous system. The 4-6 breathing technique has proven particularly effective: inhale for four seconds, exhale for six seconds. Repeat this rhythm until your pulse and thoughts calm down. This not only reduces stress, but also stabilizes your emotional state.
Short body scans help you focus: Direct your attention to your feet, legs, torso, and hands, one after the other. Or choose a fixed point on the path directly in front of you, such as a stone or a marker, and consciously walk towards it step by step. Quiet self-talk (“I can do this,” “Everything is under control”) can also help you stay focused and push your anxiety into the background.
Mental preparation beforehand
Visualize beforehand what you might expect. Imagine specifically how you will reach a narrow spot, what it will look like there, how you will feel, and how you will stay calm. You may even feel signs of anxiety. Be aware of them and use the breathing techniques from the previous section before you are out in the field. With a little practice, you will find that your body becomes increasingly easier to calm, even in real situations.
Dealing with setbacks
Sometimes things don't go as planned. Despite good preparation, your fear of heights suddenly overwhelms you again, perhaps even at a spot you had already mastered. Don't let this discourage you. Setbacks are part of the process. Your form on the day plays a big role, as do the weather, mental stress, and physical condition. It's important to persevere and see such experiences as part of the journey, not as failures.
Guided tours: Safety through experience
Guided hikes are an ideal way to approach more difficult terrain in a safe environment. You don't have to plan the route yourself, you benefit from local knowledge, and you receive targeted support along the way – calm, professional, and on equal terms. Many hiking guides or mountain guides are sensitive to the issue of fear of heights and know how to support you without putting pressure on you.
Get professional help
If you feel like you can't get anywhere on your own, it makes perfect sense to seek professional support. This could be psychological counseling, but also targeted technical training or coaching with a specialized hiking guide or mountain guide. Here you will learn the necessary skills to gain more self-confidence, improve your surefootedness, and develop solid decision-making skills in difficult situations.
Equipment
Even though equipment cannot cure your fear of heights, it still plays an important role. It can help you feel safer, provided it is suitable for the route, the terrain, and your ability level. Here are a few points you should pay particular attention to:
Trekking poles: support with limitations
Trekking poles give you extra support, especially on stable paths, ascents, or long descents. They are particularly useful on slippery surfaces such as snowfields, meadows, or mud. They also provide relief when carrying a heavy backpack.
However, on rocky, bouldery, or very narrow terrain, poles can become a tripping hazard because they make coordination more difficult. So be careful where and how you use them. Sometimes it is safer to stow them away temporarily.
Good shoes: Essential
Your shoes are the most important piece of equipment. A grippy sole with a good tread, a firm fit, and a sturdy upper are the basic requirements for safe walking in alpine terrain. If you try to save money here, you're definitely saving in the wrong place. Good shoes give you support, improve your surefootedness, and help you master even tricky sections with more confidence.
Lightweight backpack: Less is more
An overloaded backpack not only weighs down your shoulders, but also your self-confidence. The heavier you are on the trail, the faster you tire – both physically and mentally. So only pack what you really need. Everything relevant, such as weather protection, first aid, water, and food, must of course be included, but the oversized thermos cup or the book for the hut can stay at home.
Safety equipment: Only with expertise
On routes with rope or chain safety devices, it may be advisable to secure yourself additionally, for example with a via ferrata set or rope. However, please note: This is only advisable if you have truly mastered the relevant techniques. Improvised solutions with a piece of rope and household knots are not an option. They do not provide safety, but rather endanger you and others.
If you are not proficient in safety techniques, it is better to consult a professional. An experienced mountain guide knows when and how to secure you safely without giving you a false sense of security.
Training to overcome fear of heights while hiking
With our fear of heights training program tailored specifically to you, you will learn techniques for acute situations as well as methods for long-term improvement and control. Under the professional guidance of a trained hiking guide, you will set out on the path to a life without fear of heights and uncertainty in the mountains.

You don't suffer from vertigo yourself, but your hiking partner does?
Vertigo not only affects the person concerned, but also poses a real challenge for those accompanying them. Suddenly, the question arises: How do I react correctly without putting pressure on them, but also without appearing clueless?
In an acute situation: Stay calm, don't push
The most important thing is to stay calm. Your composure will rub off on the other person and help them regain their footing. Support them actively with calmness, patience, and understanding. This also means not urging them to continue. Statements such as "Come on, it's not that bad" are well-intentioned, but they don't help at all in the moment of fear. On the contrary, they can exacerbate the situation.
Practical support for moving on
If you decide to move on, walk a little ahead of the person affected and offer them a visual reference point. In particularly exposed passages, it can be helpful to reach out your hand or briefly support their arm, provided the terrain and situation allow it.
Be sure to avoid improvised technical safety measures. Not only do these measures convey a false sense of security, but in the worst case, they can lead to accidents involving others. If rope safety measures appear necessary, they should only be carried out by experienced mountain guides who know the terrain and know how to professionally secure such situations.
Turn back? A joint decision with a view to the bigger picture
If your hiking partner expresses a desire to turn back, take it seriously. At the same time, it is important to consider the overall situation: How far is it back? Is bad weather or darkness threatening? Is there perhaps even a faster and safer alternative via the exposed passage that leads to a hut or cable car?
The decision to turn back is not a sign of weakness if it is made responsibly. If turning back is possible without any problems, it should not be blocked by sporting ambition. Show mutual respect – including for personal limits – and always act in the interests of mutual safety.
FAQs Fear of heights when hiking
Yes, in many cases you can hike despite your fear of heights—if you choose your routes carefully and don't overdo it. Easy, wide paths without exposed passages are often feasible and help you gain your first positive experiences.
Important factors include realistic self-assessment, choosing suitable routes, good weather, and being prepared to turn back in good time if you no longer feel comfortable.
Fear of heights is primarily an anxiety reaction: thoughts such as “I'm about to fall,” rapid heartbeat, and panic are at the forefront. Vertigo is more of a balance phenomenon: you feel dizzy because your balance system is overwhelmed by the great depth and visual impressions.
Both can occur at the same time – in practice, it is particularly important that you approach exposed areas in a controlled manner, very carefully and with good safety measures in place.
Typical signs of fear of heights when hiking are:
- weak knees, trembling, dizziness
- palpitations, shallow breathing
- tunnel vision when looking down into the abyss
- paralysis: you can hardly move forward or backward
- high muscle tension
If these reactions occur mainly at altitude and significantly restrict you, there is a high probability that you suffer from a fear of heights or a specific phobia of heights.
Good preparation defuses many situations:
- Check the route carefully in advance (topography, photos, experience reports)
- Only choose tours that are well below your estimated stress limit
- Check the weather forecast – wet, windy, or foggy conditions can exacerbate many fears
- Start early so that you are not under time pressure
Mentally, it helps to imagine the route and visualize yourself walking calmly and with concentration.
The following are particularly suitable:
- Wide hiking trails without the risk of falling
- Tours in the forest or across meadows instead of ridge trails
- Trails with many exit options (e.g., intermediate cable car, bus)
- Official “easy” hiking trails without red/white or blue/white markings (or without red or black markings in the German Alps or Austria)
Narrow ridge trails, steep gravel slopes, or suonen and paths with a lot of air beneath your feet should be avoided at the beginning.
If you get scared of heights in the middle of your hike:
- Stop, stand steady, or—if possible—sit down
- Breathe deeply and calmly into your belly, exhaling more slowly than you inhale
- Look away from the precipice and toward the rock/slope or the path directly in front of you.
- Plan your next small step, not the entire ridge.
Talk to your companion instead of keeping everything to yourself. A calm conversation can be very reassuring in such situations.
Simple techniques that you can use at any time are helpful:
- 4-6 breathing: inhale for 4 seconds, exhale for 6 seconds, if the effort allows
- Body scan: direct your attention step by step through your body (feet, legs, hands)
- Focus technique: Fix your gaze on a nearby target (stone, marker) and consciously walk towards it
- Self-talk: Repeat phrases such as “The path is wide enough” or “I am taking one sure step after another” aloud or silently
Exercises like these reduce your stress response and bring you back to the present moment.
In the long term, gentle confrontation and training are particularly helpful:
- Start with very easy tours in safe terrain
- Increase the difficulty only in small steps
- Repeatedly gather positive experiences at altitude
- Possibly work with a professional hiking guide/mountain guide who specializes in fear of heights
Important: You don't have to completely get rid of your fear of heights. The goal can also be to learn to cope with it well and expand your personal comfort zone a little.
Fear of heights becomes particularly dangerous when you:
- venture into very exposed terrain
- panic and react uncontrollably
- ignore your own limits
Panic can lead to missteps, falls, or risky actions. However, with the right choice of tour, defensive planning, and the courage to turn back when necessary, the risk can be significantly reduced.
The following equipment can significantly increase your sense of safety:
- Trekking poles: for greater stability and balance
- Shoes with good tread: more grip means more confidence in your step
- A backpack that is as light as possible: a heavy backpack tends to pull you in one direction, making it more difficult to maintain your balance
However, equipment can never replace an honest assessment of your abilities.
